


The pile by the bed has become a tower, and the bookcase in the corner gave up months ago. You’ve seen those photos where books seem pinned to a bare wall with no bracket, no upright, just spines and shadow. The question is whether you can pull it off yourself this weekend, or whether you should just buy a set. Two methods will get you there. Neither asks for a workshop, and one of them is an evening’s work and pocket change.
Floating bookshelf or invisible bookshelf, what you’re actually making

Before the drill comes out, sort out which effect you’re after. The two are routinely mixed up online, and they don’t ask for the same kit.
A floating bookshelf is a wall-mounted shelf where the bracket hides inside the shelf itself. A metal arm bolts to the wall, the hollow shelf slides over it, and the whole thing appears to grow straight out of the plaster. Books sit on it the way they sit on any other shelf. The look reads as architectural, and it works for paperbacks, hardbacks and photo books alike.
An invisible bookshelf has no visible shelf at all. A small L-bracket goes into the wall, a hardback is glued to it so the cover and pages hide every bit of metal, and the rest of the books stack on top of that base book. The whole column reads as if it’s defying gravity. The build takes an evening, the kit costs well under what a single ready-made shelf would, and the practical ceiling is around five to seven kilograms per column.
The floating bookshelf gives you a usable surface for a proper library. The invisible bookshelf gives you a stunt that earns its place as a single feature column above a sofa, beside a fireplace, or at the half-landing of a staircase.
Building a floating bookshelf with a concealed bracket

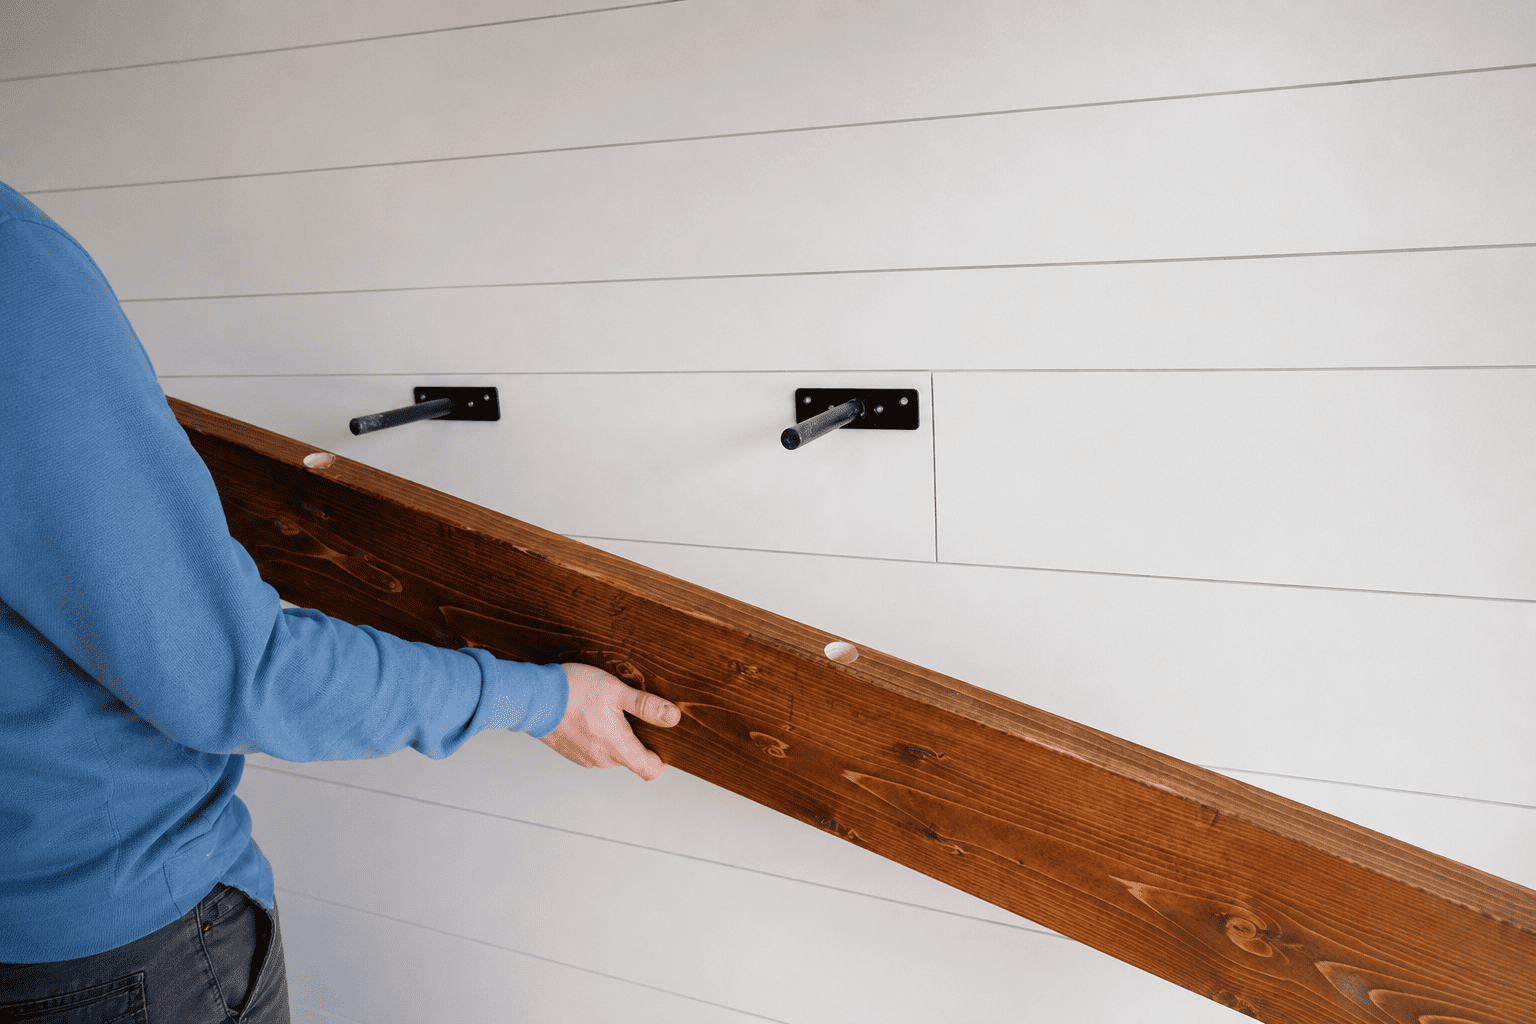
A steel rod or a pair of rods bolt to the wall horizontally, the shelf is hollow, and it slides over the rods so the fixing disappears inside it. Get the bracket level and rated for the load, and the build itself is a few hours of cutting, gluing and sanding.
What you’ll need

- A pair of steel concealed bracket rods around 30 to 45 cm long and 12 mm in diameter, available from specialist online sellers and larger DIY shops
- Pine or 22 mm MDF for the top and bottom skins of the shelf, roughly one linear metre for a 60 x 20 cm shelf
- 6 mm plywood for the front edge and the two end caps
- Wood glue, 25 mm pin nails, sandpaper at 120 and 240 grit
- A 600 mm spirit level and a drill with masonry and wood bits
- Fixings sized to your wall type (see below)
- Stain or paint plus a small foam roller
Choose the right fixings for your wall
Plasterboard is where most DIYers come unstuck. A loaded floating shelf isn’t pulling straight down on the fixing, it pulls out and down at the same time, and a standard plug isn’t designed for that lever. Heavy-duty expanding plasterboard anchors solve this by opening up behind the board to spread the load, and a pair of brackets with four anchors will hold around 20 kg on 9 to 15 mm plasterboard. The catch is the 25 mm hole each one leaves, so once you’ve drilled you’ve committed.
If the wall has timber studs (most modern stud walls are framed on 40 to 60 cm centres), find them with a stud finder and screw straight into solid timber. A pair of brackets fixed into studs will carry up to 25 kg per stud, comfortably beyond what books throw at you.
On brick or block, drill with a 6 or 8 mm masonry bit on a hammer setting, fit standard expansion plugs and 60 mm screws. A regular drill on solid masonry will overheat and oversize the hole as it goes, so the bracket loosens within months.
One quirk worth flagging: dot-and-dab walls leave a 15 to 20 mm gap between plasterboard and brick. Hollow-wall anchors that rely on flipping out behind the board can foul on the brick and refuse to seat. If you suspect dot-and-dab, knock the wall first and listen for the change in tone.
The build, step by step

Cut the top and bottom skins to length, then cut two end caps and one long front strip from the plywood. Glue and pin them into a hollow box with the back open. Once dry, sand the joints flush, fill any gaps with wood filler, sand again, then stain or paint in two coats with a light sand in between.
Now the bracket. Mark a level line on the wall where the underside of the shelf will sit. Hold the bracket along that line, mark the screw points, drill, fit your fixings and bolt the bracket on. Spin a level across the protruding rods to check they’re horizontal in both planes: a 2 mm tilt at the wall becomes a 5 mm dip at the front of a 20 cm shelf.
Slide the shelf over the rods. It should be snug. If it binds, ream the holes by a quarter turn with the drill bit until the shelf seats flush against the wall. A spot of construction adhesive inside the cavity locks it on permanently, which is useful in a guest room but skippable if you might rearrange later.
Loading it without making it lean
A shelf that sits perfectly level when empty will sag a millimetre or two under a row of hardbacks, and that’s fine. Anything more says the rods are too short for the depth, the fixings are creeping in their plugs, or the load has gone past rated weight. Load the heaviest titles closest to the wall: the front edge has the most leverage. As a working rule, fill to about 60% of the rated weight per shelf, which is the cap for the proper build. The shorter route, the one that asks for a bracket, a book and an evening, plays by different rules.
The invisible bookshelf trick you can build in an evening
The trick is older than it looks and still pulls every Instagram comment it deserves. A single L-bracket carries one tower of books on the wall, and the bottom book of the stack hides the metal entirely.
- One steel L-bracket, 100 to 150 mm on its longer arm
- Two screws of around 30 mm with wall plugs matched to your wall (plasterboard or masonry)
- One sacrificial hardback, the heavier and stiffer the better (a charity-shop encyclopaedia or old dictionary is the standard choice)
- A tube of neoprene contact adhesive or strong wood glue, a spirit level and a drill
The whole kit costs next to nothing if a couple of bits are already in the toolbox, and only a little more if everything has to be bought new.
The build, end to end, looks like this. Screw the long arm of the L-bracket flat against the wall so the short arm sticks out horizontally and dead level. Open the hardback to roughly its midpoint and hollow a shallow channel in the inside pages with a utility knife so the bracket arm tucks in cleanly. Glue the book down on the bracket, weight it overnight and let the adhesive cure. The next day, stack the rest of the column on top of the base book and step back. Every bit of metal disappears behind the cover and pages, and the books seem to start about 30 cm above where they actually do.
The whole column rests on the spine of one hardback, so paperbacks make a terrible base: the cover flexes under load and the tower starts to lean within a week. The fixings carry the same out-and-down force a proper floating shelf does, so the plasterboard rules above still apply, with a hard ceiling near 5 to 7 kg per column before the spine of the base book begins to compress.
Pick the spot with care. The illusion works best where the eye expects to read a single column rather than a row of shelving: above the head of a bed, beside a chimney breast, or at the turn of a staircase. Used as a working library it collapses fast, both visually and literally.
What the DIY actually costs (and how long it takes)
Adding up the receipts is where the romance of the project usually dies. Both methods come in under what a finished steel set costs, but the gap is narrower than DIY blogs let on once you count the trips back to the hardware shop and the offcuts.
| Method | Cost level | Active time | What you end up with |
|---|---|---|---|
| DIY floating shelf with concealed bracket | Moderate kit cost per shelf | 4 to 6 hours plus 24 hours of stain cure | One bespoke shelf in the wood and finish of your choice |
| DIY invisible bookshelf trick | Lowest entry cost of the three | 30 to 45 minutes | One feature column with a 5 to 7 kg ceiling |
| Ready-made wall-mounted set | Higher upfront, lower per-shelf in a set | 15 minutes per shelf | Multiple matching shelves with a factory-grade finish |
The figures assume the drill and the level are already in the cupboard. If they aren’t, add the cost of a basic combi drill and a 600 mm spirit level to the bill, both of which earn their keep on every job afterwards.
The hidden cost is time. A first-time DIY shelf rarely fits cleanly on the first dry run. Reaming the bracket holes, filling pin nail marks, sanding a stain run from the underside, none of it is hard, but each step has to wait for the previous one to dry. A realistic build is Saturday plus a Sunday morning, not the four hours the cutting list suggests.
Multiply by three and the maths shifts again. Three DIY shelves push past what a matching factory set would cost and tie up a full weekend of work, and the finishes rarely sit together as cleanly. For a wall of floating bookshelves in matching dimensions, a ready-made set almost always wins on time, finish and budget once the count goes past two.
When a ready-made set wins
DIY pays off when you want one shelf at a precise dimension you can’t buy off the peg, or when half the appeal is the build itself. It stops paying off the moment you’re composing a whole wall.
A factory shelf gives you four shortcuts the DIY route can’t offer at any price. The bracket is folded from a single sheet of Italian steel, so rod thickness and depth are tuned to the shelf, and there’s no second-guessing whether a 30 cm bracket bought separately will hold 60 cm of books. The shelf is pre-drilled at the bracket points, which means once the bracket is up, the whole thing is on the wall in two screws and a level. The finish is powder-coated steel rather than stained timber, so there’s no grain to match, no end-grain to seal, no second coat to sand between. And eight shades cover everything from cool greys and off-whites to deep brassy reds, so you can compose a wall the way you’d plan a gallery hang.
There’s also repeatability. A set of four or six identical floating bookshelves reads as a single piece of furniture rather than a sequence of one-offs. The same logic applies to vertical stacks. For the books-floating effect without the staged-magic feel of the L-bracket trick, the invisible bookshelves range achieves the same illusion at scale, with the bracket built into the back of each shelf rather than glued behind a hardback. For a brighter scheme, a single white floating shelf reads almost as architectural moulding against a coloured wall.
Three quick checks tell you when the buy verdict has already been made:
- You need more than two matching shelves to compose a wall
- Your DIY confidence stops at hanging a TV bracket
- The finish has to read as furniture, not as a Sunday project
Hit any of those and the saw dust isn’t worth the time.
Step back from the pile and the verdict isn’t a money question at all. For one quirky column above a reading chair, the L-bracket trick walks you through the evening on pocket change and a sense of victory. For a single bespoke shelf at a dimension you can’t find anywhere, the concealed-bracket build pays back over a weekend. For a wall that has to look intentional, a steel set built around two screws and a hidden bracket finishes the job in the time it takes to drink a coffee.
Frequently asked questions
Can floating bookshelves hold heavy hardbacks?
Yes, within their rated load. A pair of brackets fixed into timber studs will hold around 25 kg per shelf in most domestic installs, which works out at roughly 18 to 20 standard hardbacks. The numbers tighten on plasterboard alone: even with quality expanding plasterboard anchors, the ceiling sits near 20 kg per shelf. Load the heaviest titles closest to the wall to keep the centre of gravity over the brackets, and you can find a more detailed walkthrough in our guide on how to hang floating bookshelves.
Do floating bookshelves work on plasterboard walls?
They do, with the right fixings and the right expectations. A bracket fixed to plasterboard alone is being pulled out and down at the same time, so standard plugs aren’t built for the job. Use heavy-duty expanding anchors or hollow-wall anchors rated for the board thickness, and plan for around 20 kg per shelf as a safe working load. For anything heavier, or for a multi-shelf wall, find the studs and fix straight into timber.
How deep should a floating bookshelf be?
Between 15 and 20 cm covers most book sizes without losing the floating look. A 15 cm shelf takes paperbacks and standard novels with about 1 cm of clearance at the front. A 20 cm shelf swallows hardbacks, photo books and most art books. Going deeper than 25 cm pushes bracket capacity sharply down because the leverage at the front edge increases, so deeper shelves call for shorter spans or heavier-gauge rods.
Will a floating bookshelf sag over time?
A small initial settle is normal, usually under 2 mm in the first month at full load. Anything beyond that points to one of three issues: the rods are too short for the shelf depth, the wall fixings are creeping in their plugs, or the load is past rated weight. Powder-coated steel brackets show no measurable creep over many years of domestic use, while softwood shelves on softwood ledgers can settle further as the timber dries out and the joints relax.